A warning to homeowners of the risks involved in do-it-yourself electrical installations.
Napoleon once referred to Britain as 'a nation of shopkeepers'. Probably not true in modern society, but we still certainly a nation of something - do-it-yourselfers.
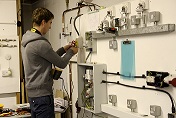
More and more people are willing to have a go at things they may have once thought impossible, taking regular visits to the local DIY shop to get parts for little jobs here and there or even working toward bigger projects such as renovating a room or building a conservatory. However, when it comes to plumbing, gas and electrical jobs, such concerns are better left to the professionals. Meaning those certified to carry out the work.
Jobs for an electrician
 A homeowner can legally undertake basic electrical jobs themselves, such as installing an additional socket/light or connecting a cooker to an existing connection unit, but not much more than that. Anything more complicated like installing a new shower circuit or a new cooker circuit, legally requires a qualified electrician. If you have any DIY plans that require electrical work, it's always best to check what you are legally able to do before starting.
If you have any doubts on the legality or your capability to do the job safely in the first place, do NOT attempt it yourself and instead seek out the help of a qualified professional. Not only will you be ensuring that the job is done safely and properly, but you'll be saving yourself money in the long run. Hiring an electrician to fix a botched job usually ends up costing more than getting one out to do the job in the first place.
Building Regulations
District councils have responsibility for ensuring that any building works meet the national Building Regulations for efficiency, safety, design and disabled access. Building Regulations must be obtained from the local council before any structural alteration is made to a home. Such regulations are easier to obtain if the homeowner can prove they are going to be using a qualified electrician to undertake the work.
Part P qualified
A Part P qualified electrician is one who is able to sign off their own work in domestic properties. If they aren't qualified, then they'll have to approach the local authority building control to approve their work. This is something that all homeowners should bear in mind when they are looking to hire a qualified electrician.
Risks
It doesn't take much for electricity to kill. Forget numbers like 10,000 volts, the 230 volt domestic supply running through your home is more than enough. Our bodies use electrical signals to control our organs and any excess voltage will interfere with these, causing hearts and lungs to stop functioning and eventually death. Poorly installed electrics can very easily also start fires, resulting in home owners losing everything when their houses are burnt to the ground because of some faulty wiring. And if that work goes against building regulations, you may find the property is not insured and the insurance company is not legally obliged to reimburse them. On average, around 30 people die each year due to low voltage electrocutions and electrical burns. In addition, two and a half million people will receive a mains voltage electric shock every year, and 350,000 will receive a serious injury. Another 46 will die each year as an indirect result of faulty electrical wiring or the poor installation of electrical equipment.
Differing standards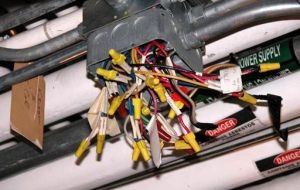
The majority of contractors in the UK are reliable and are certified as such. To become a qualified electrician takes between three and five years of study. Some contractors may however pass themselves off as qualified, citing qualifications obtained in other EU countries. However, the standards in wiring differs across both the EU and the rest of the world, so what qualifies as a qualified electrician in one country is unlikely to be anywhere near the standard required in the UK.
Registers
To find an electrical contractor to undertake domestic tasks, the best place to start is often a register such as the Electrical Safety Register at www.electricalsafetyregister.com. Electricians who register with the Electrical Safety Register must meet a very high industry standard, which means that consumers who use an ESR registered contractor are guaranteed an exceptionally high standard of work. In addition, all work carried out by Electrical Safety Register contractors is guaranteed. Any deficiencies in the work carried out are resolved at no extra cost.
Kick out the Cowboys
Electricians with fake qualifications performing sub-standard work is a continuing problem in Britain. Despite their poor (and often dangerous) results, such workmen still expect to be paid for their work and can get heavy handed if refused, especially against the vulnerable.
In an effort to show up shoddy workmanship, electrical wholesalers Gil-Lec has set up a Twitter campaign using the hashtag #KickOutCowboys. Anyone who provided poor electrical work can be named and shamed via the Twitter campaign. Twitter users are encouraged to post photographs of poor electrical work, coupled with the name of the individual or company who performed the work.
Via Electrical Contracting News
- Mark Jenkins
-----
Mark Jenkins is the Electrical Course Development Manager here at Access Training. If you would like to learn more about electrical work and maintenance, you might want to consider one of the many electrical training courses we offer. These are available for both DIY enthusiasts AND people looking to gain the vital qualifications needed to make the career change to become an electrician. To find out more give us a call on 0800 345 7492.